Easy Overnight Sourdough Bread Recipe With Starter
I know “easy”, “overnight” and “sourdough bread” don’t really sound like they go together well but, don’t be scared to try making your own sourdough bread at home – it’s a lot easier than you might think! This particular sourdough loaf does require overnight proofing – it doesn’t make it any harder to make than our other homemade sourdough bread recipe, but it does mean you will need to allow more time. Just a heads up – you will need a dutch oven to bake this loaf.
To make this overnight sourdough bread you’ll need to get started the day before you plan to bake it. I’d also suggest that you start in the morning, or at least not too late in the day as it does take a few hours of proofing and stretching before it gets put in the fridge for it’s overnight proofing session.
I usually feed my sourdough starter every morning so, to make this loaf, I remove the starter I need for the bread, feed my remaining starter/mother dough/culture and then proceed with the first steps of preparing the bread.
So, to begin with, you will obviously need an active sourdough starter. It’s easy to make your own, but you’ll need to allow a week or so before your new sourdough starter is active and ready to bake with. Here’s a quick and easy way to make your own sourdough starter from scratch.
Assuming you’ve already got your sourdough starter and you’re ready to make a start, here’s what you need to do:
Begin by measuring out 175g of your sourdough starter into a large mixing bowl.


Next add 360g of water (yes, I do weigh the water).


And mix it together with a fork.


Then add the flour (550g).


And some salt (9 grams).


Mix it all together with a fork.


And that’s it for adding ingredients! I told you it was easy!
The dough will look wet and sticky and not like a properly formed bread dough that you might be familiar with – don’t worry, it’s meant to be that way.
Cover the dough with plastic wrap and let it sit (at room temperature or somewhere warm) for 1 hour.


Our house was a bit too chilly for bread making so I employed my warm hot water bottle to help keep my dough happy.


Once the hour is up, it’s time for the first “stretch and fold”. We don’t want to knead this bread dough or we’ll lose all of those lovely bubbles that start to form in the dough as it proves.
Instead we use the “stretch and fold” technique. Don’t worry, it’s not hard at all, in fact it’s quicker and easier to do than kneading.
With freshly washed, clean hands, pick up a section of your dough and stretch it out:


Then fold this dough back over the top of the rest of the dough:


Then turn the mixing bowl one quarter rotation and repeat this process:


Another quarter turn of the bowl and stretch and fold some more:


Keep doing this until you’ve stretched and folded each quarter of the dough (so four times) and you’ll finish up with a neatly folded ball of dough like this:


Cover it again with plastic wrap and put it somewhere warm for another hour.


Now we just have a lot of waiting and some stretching and folding to do over the next few hours! Each hour for the next 3 hours, repeat the stretch and fold technique with your dough.
You’ll notice it will start to grow larger and fuller each hour and your dough ball will start to look a bit tidier.


After your third and final stretch and fold, cover the dough with plastic wrap again but this time, instead of keeping it warm, the dough is going to go into the fridge for its overnight proving/fermentation.


The dough should stay in the fridge for at least 12 hours but you could also leave it there for up to 48 hours if that suits your bread baking timetable better.
So, 12-48 hours later when you’re ready to begin the next phase of the sourdough bread baking process, remove the dough from the fridge and leave it for about 30 minutes or so to give it time to come back to room temperature a bit.


Tip/scrape the dough out of the mixing bowl onto a lightly floured surface or pastry mat.


Remember, we’re not going to knead the dough as we want to try to maintain some of the lovely bubbles that will have formed in the dough during the fermenting process.
Instead we need to do a similar process to the stretch and fold where we gather up pieces of dough at the sides and pull them together to meet in the middle at the top of the dough ball, making it look a bit like a large dumpling!


You can see some lovely big bubbles have formed in this dough – try not to pop too many in the process!
For the dough’s final rest before it goes in the oven, you can use a bread proofing basket, or if like me, you don’t happen to have one of these fancy bread baskets, you can use a lightly oiled mixing bowl. I’ve tried using baking paper to line the bowl but found it actually got quite stuck to the bread dough, so I’ve found a lightly oiled bowl works better.
Carefully lift up your ball of dough and place it, seam side up, into your lightly oiled bowl or bread proofing basket.


Any close observers amongst you may have noticed that there is some oil on the dough in the above picture – whoops! I wasn’t concentrating and put my dough into the bowl seam side down. Then I remembered it needs to be seam side up so I quickly flipped it over which, of course, resulted in the entire ball of dough getting a light oiling!
Cover with a clean kitchen towel and put it in a warm place again for its final resting time of about 2 hours.


After 1 hour of this proving time has passed, turn the oven on to 450℉ or 230℃ – we want plenty of time to preheat the oven and get it nice and hot.
Place your (empty) dutch oven into the oven after 15 minutes or so, so that it has about 45 minutes of pre-heating.


Once the 2 hours is up, your dough should be looking slightly puffier and ready to bake.


Now for the fun part of flipping your dough out of the bowl or bread basket and into your preheated dutch oven.
To do this I line a baking tray with baking paper and sit it on top of the mixing bowl (or bread basket).


Then flip the whole thing over so that the mixing bowl is upside down and the bread dough falls out onto the baking paper on the tray.


Then you can score the top of the dough and make a pretty pattern. I usually use a dough scraper for this but decided to try using a knife this time instead…I think the dough scraper works better – this pattern didn’t work out too well when baked, but it was fun to try!

Carefully lift the baking paper and the dough into your hot dutch oven – be careful – it’s very hot!


Then put the lid on the dutch oven and put it back into the hot oven for 25 minutes.


After 25 minutes remove the lid of the dutch oven and continue cooking for another 20-25 minutes.


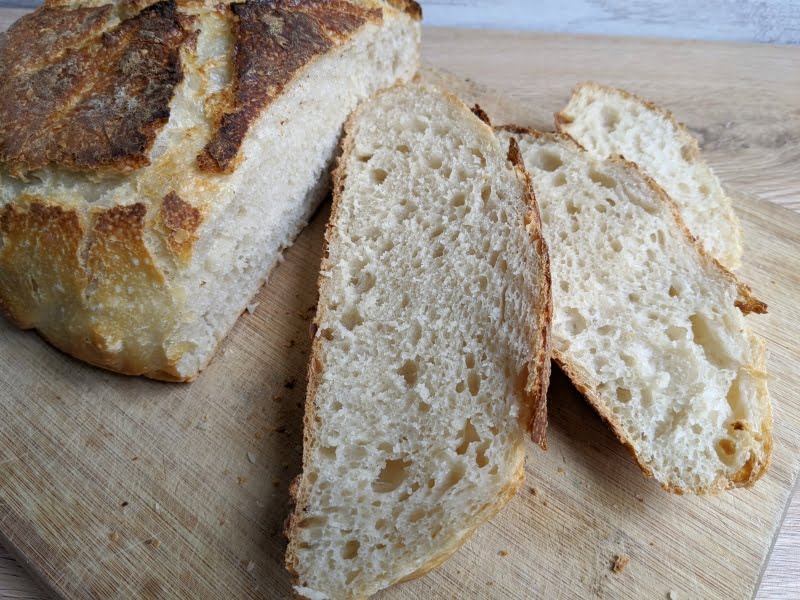
Remove from the oven when nice and brown (this loaf almost got too brown!).


Tip out onto a cooling rack to cool completely before slicing.


Easy Overnight Sourdough Bread Recipe
Easy Overnight Sourdough Bread Recipe With Starter
Ingredients
- 175 g sourdough starter/mother culture
- 360 g water
- 550 g plain/all-purpose flour
- 9 g salt
Instructions
- Combine sourdough starter and water in a large mixing bowl.
- Add flour and salt.
- Mix together with a fork (or clean hands) until it comes together as a wet, sloppy dough.
- Cover with plastic wrap and leave at room temperature for 1 hour.
- Perform “stretch and fold” maneuver every hour for the next 3 hours - keep the dough in a warm place between stretchings (I like to use a hot water bottle).
- After the last “stretch & fold” cover with plastic wrap and place dough in the fridge for at least 12 hours (up to 48 hours).
- When ready to begin the baking process, remove from the fridge, and leave for 30 minutes or so to bring the dough back towards room temperature.
- Tip dough out onto a lightly floured surface.
- Shape dough with hands or a dough scraper, by bringing the sides of the dough up to meet at the top - like doing a lot of mini stretch and folds.
- Place the dough, seam side up, in a lightly oiled mixing bowl or a prepared and seasoned bread proofing basket.
- Cover with a clean kitchen towel.
- Leave to rise in a warm place (hot water bottle) for 2 hours.
- After 1 hour of this time, preheat oven to 450℉ / 230℃
- 15 minutes later, place empty dutch oven into the oven to allow it to preheat for around 45 minutes.
- When the 2 hours of final resting is up, use a baking paper-lined baking tray to flip bread dough out of bowl or proofing basket.
- Score the dough with a dough scraper or sharp blade.
- Lift the baking paper holding the dough and drop both the dough and paper into your hot, preheated dutch oven.
- Place lid on the dutch oven and place the whole thing into your hot oven for 25 minutes.
- After 25 minutes remove the lid and continue cooking for another 20-25 minutes until the loaf is golden brown.
- Remove from oven and cool loaf on a cooling rack.
- Allow bread to cool completely (at least 1 hour) before slicing.
See, it’s not as bad as you might think! Sure, there are quite a few steps in the process and it does take a fair bit of time…but most of that is spent waiting for the dough to rest/rise. Once you’ve made this recipe a couple of times it becomes almost second nature and very easy to do.
All you need is your sourdough starter, flour, water and salt and, with a little bit of planning and time management, you could be enjoying this easy overnight sourdough bread recipe everyday!